Getting Around the System
The Main Menu is the starting point for anything that you might want to do in SpendMap.
What you can see/access in the main menu is determined by our User Profile.
If you started using SpendMap prior to version 16, you can switch to the Classic Theme using the menu in the User Profile section, at the top-right of the Main Menu.
See also: Control Center.
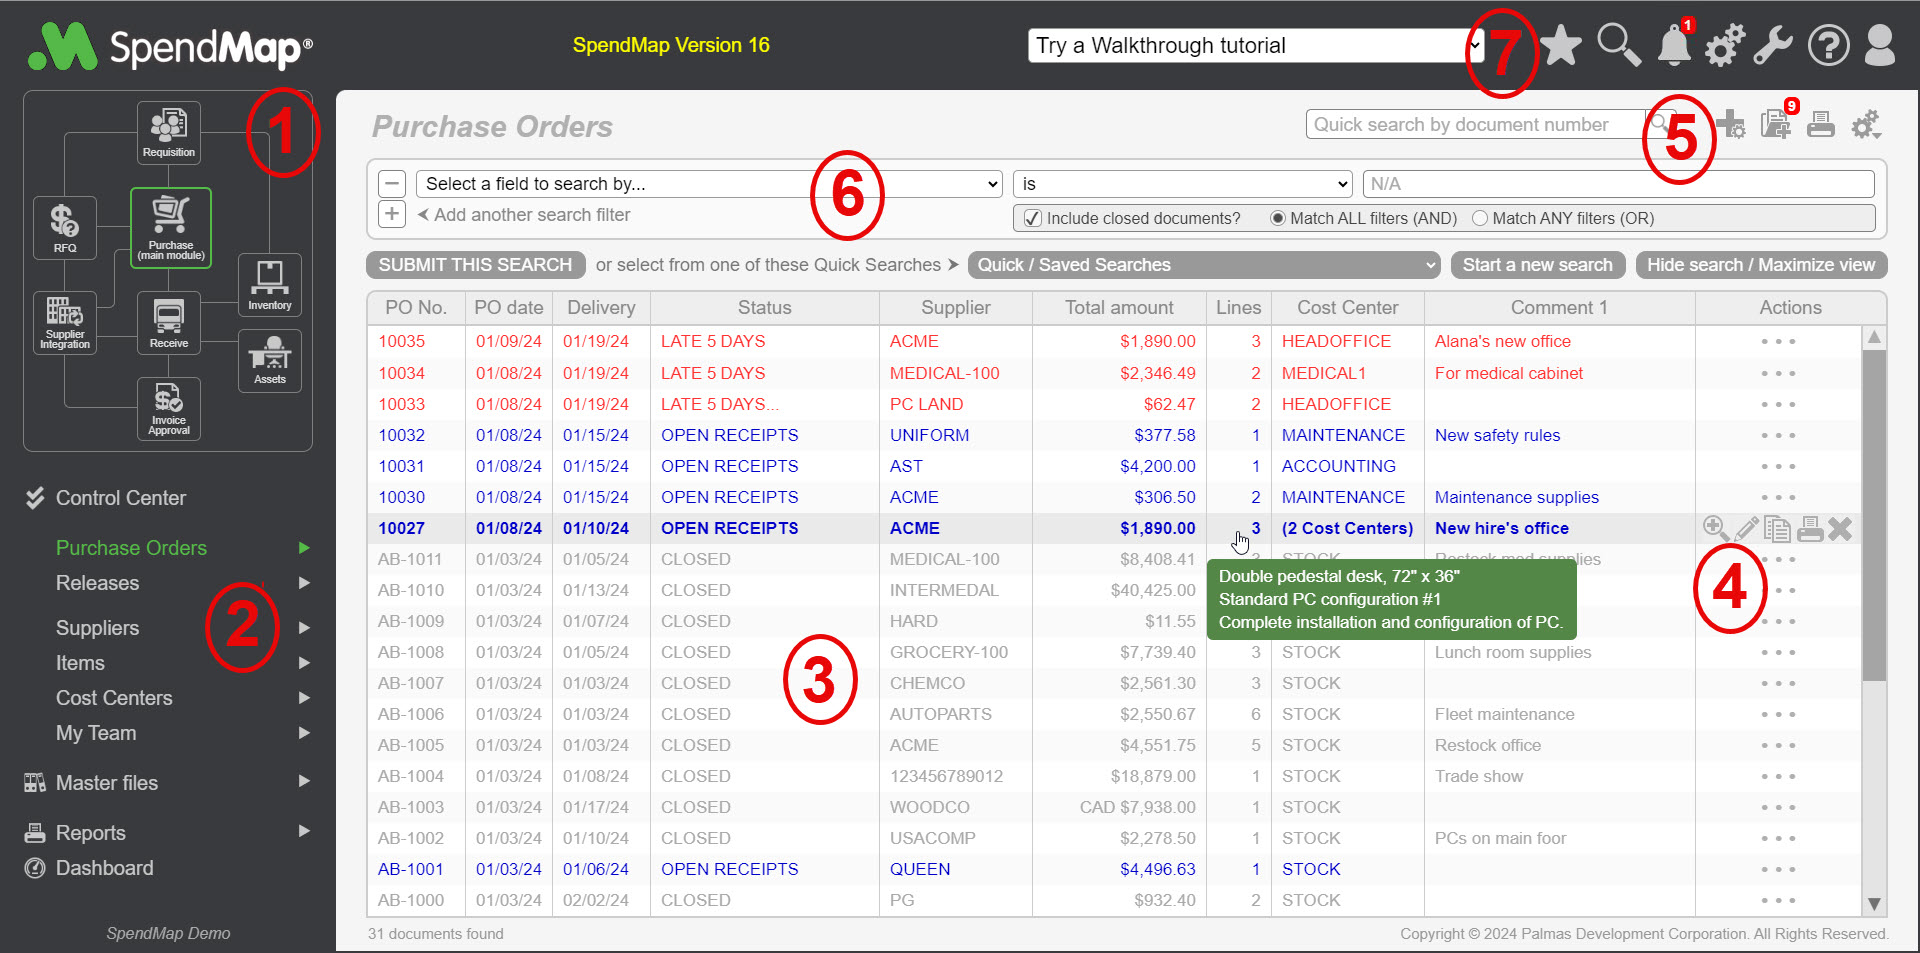
The Module Navigation Map in the top section of the Left Navigation Bar includes icons for each system module and depicts the flow of information between modules.
Click on the images to change to a different module. The currently selected module will be highlighted in green.
The Modules you can access are determined by your User Profile.
|
The bottom section of the Left Navigation Bar includes direct links ("Favorites") to the most popular documents/transactions and Master Files in the selected Module.
Click on the favorites/links to display a list of the respective documents/transactions or Master File entries.
The favorites/links displayed here are determined by your menu access; you will not see a link here unless you have access to the related menu option.
Additional documents and master files are available through the menus, by clicking the “>” symbol.
|
In the center of the Main Menu, you will see the contents of the selected document type or master file, displayed in a grid/list.
When you add new suppliers, items, Purchase Orders and other transactions, they will appear in the list. Use the icons in the Action Toolbar (4) and the List Toolbar (5) to add and remove items from this list.
NOTE: For documents, you will only see the processed (live) transactions here. "Draft" documents/transactions that are still in your Work Areas will not be listed here, until they are processed.
|
The Action Toolbar in the right column of the Contents grid/list (3) provides shortcuts to the most common features for each document or Master File in the list, such as the ability to modify, copy, print or delete a document or Master File code.
Again, for more options, use the “>” menus, to the right of each Section, in the left navigation bar.
|
The icons in this List Toolbar, above and to the right of the Contents grid/list (3), relate to the contents of the list, below.
In most cases, you will see icons to add new documents or Master File entries (i.e. the “+” icon), an icon to print the contents of the list ("printer" icon), and often you will see icons to export the list, or run related maintenance operations that will affect the list, like archiving old Purchase Orders, which you will find in the “gear” (Bulk Operations) icon.
|
Search options appear above the Contents grid/list (3), and limit/filter the contents of the list.
To quickly jump to a specific document or Master File record, use the "Quick search by document/code" field, otherwise you can search on any field using the drop list to the left.
When you return to this section/list, SpendMap will remember your previous search. You can also save commonly-used searches for fast and easy access, using the "Quick/Saved Searches" drop-list.
Click [+] (Add another search filter) to add new field to search by. You can add as many search filters as needed. Note the radio button to "Match ALL filters" or "Match ANY filters".
Select [Start a new search] to start over or use [-] (Remove) button to delete individual search filters.
|
At the top-right of the Main Menu you will see icons that display menus that relate to the entire module, like module settings, maintenance utilities, help resources, and so on.
Right-mouse click on the drop-down menus to view the Online Help.
The menus displayed here are determined by your menu access.
|